Table of index (click to expand)
Introduction
NOTE: Although Windows 3.0 can be installed in DOSBox, there is little practical use other than curiosity or historical research. Most early 16-bit Windows games and applications run just as well, or better, under the later Windows 3.1x.
Windows 3.0
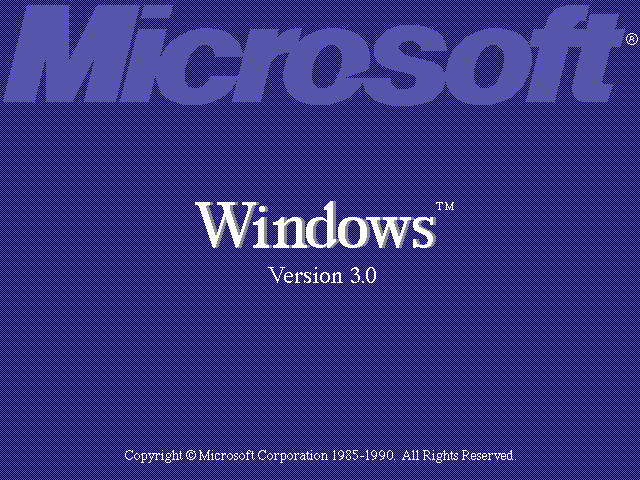
Windows 3.0 is part of a series of 16-bit operating environments produced by Microsoft for use on personal computers, released May 22, 1990.
It is a successor to Windows 2.x, and provides the following new or updated features:
- Revamped UI
- Supports up to 16MB RAM
- Supports virtual memory (swap)
A minor Windows 3.0a update was released in December 1990 which fixed some installer problems, and allows programs to call into real-mode when started in standard mode.
Windows 3.0 Multimedia Edition
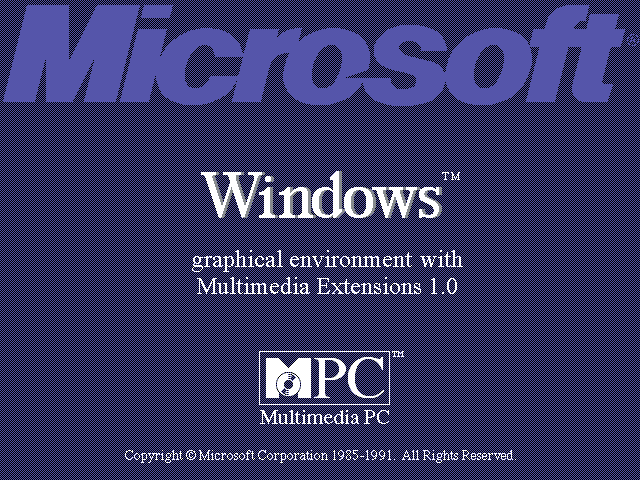
In October 1991, Microsoft made an OEM only release of Windows 3.0a with Multimedia Extensions, also known as Windows 3.0a Multimedia Edition. It was not available as a stand-alone release, nor was it available as a separate add-on to Windows 3.0.
The Multimedia Edition, in addition to any OEM customisation features adds:
- Support for digital audio files
- Support for MIDI devices
- Support for screensavers
- Support for joysticks
- Support for audio CD-ROMs
Two OEM Multimedia Editions are known to exist:
- Creative Labs edition, shipped with a Multimedia upgrade kit
- Tandy edition, shipped with a Multimedia upgrade kit
Both Multimedia upgrade kits shipped with a CD-ROM drive and Sound Blaster Pro, although in the Tandy edition it was re-branded as either the Tandy Sound Blaster Pro 16 or Tandy Sound Blaster (16 bit).
Unlike a regular Windows 3.0 edition, which only came on floppy disks, these Multimedia editions came on CD-ROM.
[Top]
DOSBox config
Here is an example dosbox config for use with Windows 3.0. Save this as dosbox.conf in the root of the directory where you will install Windows 3.0.
[dos]
expand_shell_variable=true

[dosbox]
memsize=16
machine=svga_et4000

[sblaster]
sbtype=sbpro1
# For the Tandy Windows 3.0 Multimedia Edition,
# you may want to un-comment the following settings
# irq=10
# dma=3

[autoexec]
@ECHO OFF
MOUNT C .
C:
IF EXIST C:\MWINDOWS\WIN.COM GOTO MWINDOWS
IF EXIST C:\WINDOWS\WIN.COM GOTO WINDOWS
ECHO No Windows installation found
GOTO END

:MWINDOWS
echo Starting Windows 3.0a with Multimedia Extensions
SET PATH=%PATH%;C:\MWINDOWS;
SET TEMP=C:\MWINDOWS\TEMP
C:\MWINDOWS\WIN.COM
GOTO END

:WINDOWS
echo Starting Windows 3.0
SET PATH=%PATH%;C:\WINDOWS;
SET TEMP=C:\WINDOWS\TEMP
C:\WINDOWS\WIN.COM
GOTO END

:END
[Top]
Installation
The installation steps provided are for installing Windows 3.0 in a folder mount, as that is the recommended way of running Windows 3.0. It is also possible to boot real DOS in DOSBox and run Windows 3.0 from there, but this is not covered by these instructions.
Start DOSBox with the above config file, and mount the DOSBox virtual C: drive to a folder:
e.g. to mount the current host directory (.) as the virtual DOSBox C: drive, and make it the current drive:
MOUNT C .
C:
NOTE: If during installation you get prompted that setup needs "mouse.SYS", press the "Cancel" button followed by "Ignore". It is looking for the DOS driver for the Microsoft Mouse, which is not actually needed unless you are running real DOS in DOSBox, and want mouse support when running DOS applications from Windows 3.0.
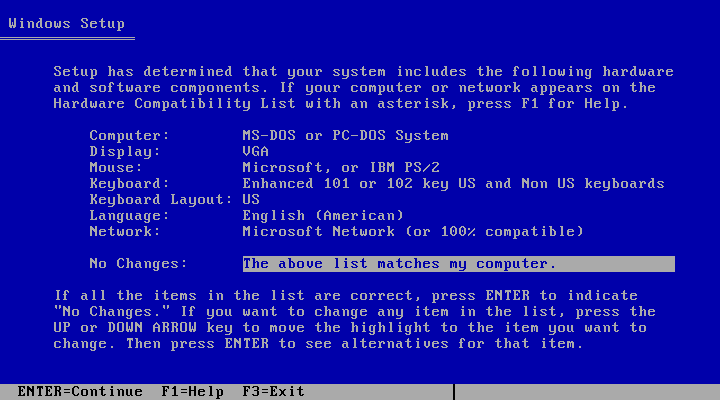
Windows 3.0 Installation
Windows 3.0 shipped on five to fifteen floppy disks, depending on media type. It is possible to mount them all and swap between them with the CTRL-F4 hot-key when prompted by the Windows installer to swap the disk. But this is a laborious process, and DOSBox provides no feedback that the disk has been swapped or which disk is the current one (other then looking at the LOG output).
If you want to use this process, it is recommended to use high-density media types such as 1.2MB disk images.
e.g., when using a 5 disk version (1.2MB media type):
IMGMOUNT A DISK01.IMG DISK02.IMG DISK03.IMG DISK04.IMG DISK05.IMG
A:
SETUP
Another way is to extract the contents of all the disk images and place it in a single folder, such as INSTALL. This is also useful if in the future you ever need to re-install Windows 3.0. You can use any program that can open the disk image files to extract them, including DOSBox itself!
e.g., from DOSBox when using a 5 disk version (1.2MB media type):
MKDIR INSTALL
IMGMOUNT -T FLOPPY A DISK01.IMG
COPY A:\*.* C:\INSTALL
IMGMOUNT -U A
IMGMOUNT -T FLOPPY A DISK02.IMG
COPY A:\*.* C:\INSTALL
IMGMOUNT -U A
IMGMOUNT -T FLOPPY A DISK03.IMG
COPY A:\*.* C:\INSTALL
IMGMOUNT -U A
IMGMOUNT -T FLOPPY A DISK04.IMG
COPY A:\*.* C:\INSTALL
IMGMOUNT -U A
IMGMOUNT -T FLOPPY A DISK05.IMG
COPY A:\*.* C:\INSTALL
IMGMOUNT -U A
What you are doing here, in order is
- create an
INSTALLdirectory - mount a floppy disk image on the DOSBox virtual A: drive
- copy the contents of the floppy disk to the
INSTALLfolder - unmount the floppy disk
- repeat steps 2-4 until all disks have been copied.
After this, you can start the Windows installation simply from the C:\INSTALL folder, and the installer will not prompt for disk changes.
CD INSTALL
SETUP
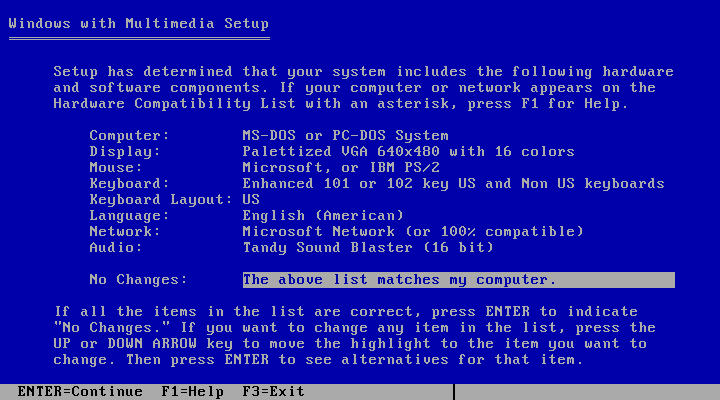
Windows 3.0 Multimedia Edition installation
The Multimedia Editions shipped on CD-ROM, which makes the installation a lot easier.
The process is as follows:
- mount the CD image file on a virtual drive letter in DOSBox
- go to the virtual drive and enter the
MWINdirectory - start the
SETUPprogram.
e.g.,
IMGMOUNT -T CDROM D WIN30ME.ISO
D:
CD MWIN
SETUP.EXE
[Top]
Video
When running SETUP to install Windows 3.0, select the default VGA 640x480 in 16 colour driver. After installation, a 3rd party video driver can be installed.
The best DOSBox emulated video adaptor for Windows 3.0 is the Tseng Labs ET4000. For this set machine=svga_et4000 in your dosbox config file. The latest Windows 3.0 compatible drivers, released Jan 15, 1992 are available here.
This will allow video modes such as:
- 640x480 up to 16.7M colours
- 800x600 up to 65k colours
- 1024x768 up to 256 colours
- 1280x1024 with 16 colours
NOTE: The ET4000 Turbo (ETTURBO) driver options are not compatible with the DOSBox ET4000 emulation.
Alternatively you can use one of the following:
- Tseng Labs ET3000 using
machine=svga_et3000and the drivers dated Jan 15, 1992 - Paradise Systems PVGA1A using
machine=svga_paradiseusing the drivers dated Dec 19, 1990
When selecting a colour depth, keep in mind that some 3rd party Windows software will not work, or work properly, at colour depths greater than 256 colours.
[Top]
Sound
Windows 3.0 Sound
Windows 3.0 does not really support sound. It only supports the PC Speaker, and even then is limited to a simple "beep" sound.
Some early Windows games will directly access the PC Speaker, without a driver, to get more complex sounds.
In addition, it is possible to install early versions of Sound Blaster software for Windows 3.0, which provides its own proprietary sound API, to allow the included Jukebox and Mixer to access the hardware.
Windows 3.0 Multimedia Edition Sound
The known editions only work properly with a Sound Blaster Pro, so be sure to set-up your DOSBox config with sbtype=sbpro1. There are no known drivers for other sound cards, and this edition is incompatible with Sound Blaster drivers for other Windows versions.
The Creative Labs edition during installation will ask for base IO port, IRQ and DMA for the Sound Blaster Pro. But the Tandy edition will only ask for the base IO port. The Tandy edition defaults to a rather uncommon IRQ 10 and DMA 3. As such you either need to set those in your dosbox config file as irq=10 and dma=3, or alternatively, after finishing the installation edit C:\MWINDOWS\SYSTEM.INI to set the IRQ to 7 and DMA to 1. Failing to do so can cause Windows to crash when playing sounds.
Apart from the included software from Microsoft or the OEM there is little 3rd party software that supports this edition. Be sure to look on the game box for both support for Windows 3.0 and the "Multimedia Windows" or "Windows MPC" logo.
Some known titles:
- Early Sierra Online Windows editions such as:
- Mixed Up Mother Goose
- King’s Quest V
- King's Quest VI
- Space Quest IV
- Laura Bow 2
- Freddy Pharkas
- EcoQuest 1 (original CD-ROM edition)
- Battle Chess Enhanced CD-ROM
MIDI
By default the Sound Blaster Pro OPL2 chips will be used to play back MIDI files when using the Multimedia edition "Media Player" application. But if DOSBox-Staging is properly set-up for MIDI playback using for instance the integrated FluidSynth or an external (to DOSBox) MIDI synthesizer, this can be used with the Multimedia Edition.
To use the DOSBox-Staging integrated FluidSynth, add the following config section to your dosbox.conf config file:
[midi]
mididevice = fluidsynth

[fluidsynth]
soundfont = default.sf2
If this worked, running the MIXER command from the DOSBox prompt should show an "FSYNTH" channel. If not, you will have to change the soundfont = setting to point to a valid MIDI sound font file on the host. See MIDI sound fonts for examples.
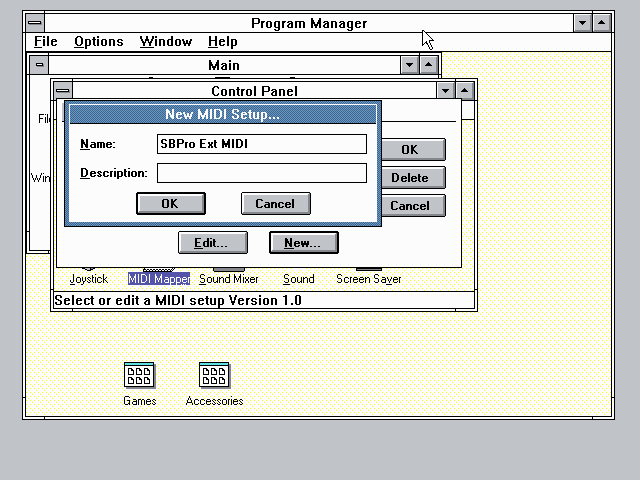
To set-up MIDI in Windows 3.0 Multimedia Edition, go to "Control Panel" and open "MIDI Mapper".
In the "MIDI Mapper" dialogue box click on the "New…" button. You will be asked for a name and description. You can name it anything you like, for instance "SBPro Ext MIDI", and click the "OK" button. You do not have to enter anything for the Description.
You will then get a "MIDI Setup" window. The only thing you want to change here is the "Port Name" to "SB MIDI Out" for all 16 lines. You may also notice that for each line the active checkbox gets checked, this is correct. Once finished click the "OK" button and confirm the save.
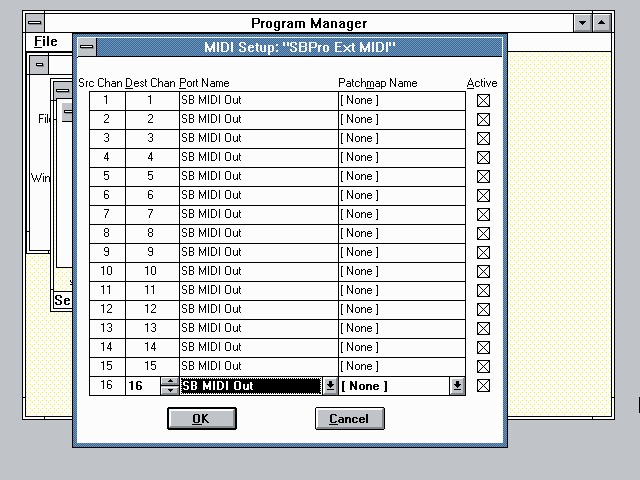
You should now be able to open the Windows 3.0 "Media Player" application and playback something like C:\MWINDOWS\MMDATA\CANYON.MID.
[Top]
Mouse
An alternative mouse driver can optionally be installed, which when running Windows 3.0 in windowed mode, will allow the mouse to move-in and out without locking the mouse to the window.
Please see the Windows 3.1x improved mouse driver section for more details.
[Top]
Printing
DOSBox-Staging has no support for emulating a printer, or even for emulating a parallel printer port. As such you cannot print directly from Windows 3.0 to a real printer.
But there is a work-around. To use the ability of Windows 3.0 to print to a file, which can then be opened on the host with an application able to handle PostScript files, for printing or saving as PDF.
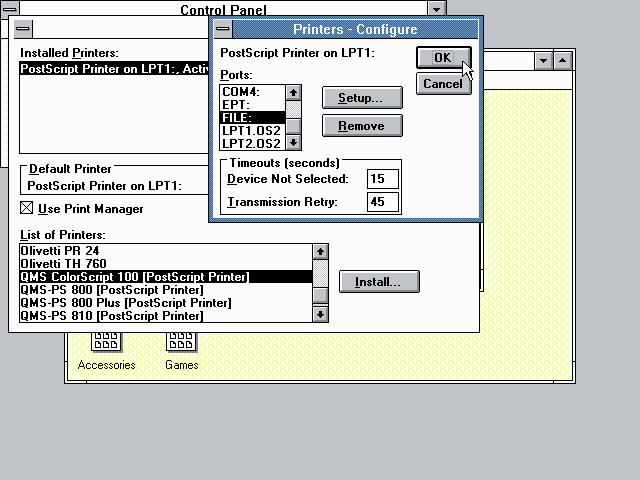
In Windows 3.0, open the "Control Panel" followed by the "Printers" control panel. In the list of printers, select the "QMS ColorScript 100" (a 300 dpi PostScript Level 2 colour printer) and click the "Install..." button.
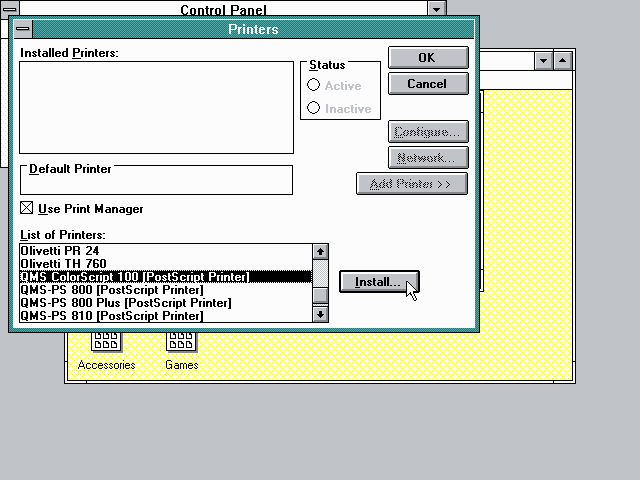
When it prompts you for a Windows setup disk, point it to the location where you unpacked the Windows 3.0 installation disks. e.g., C:\INSTALL.
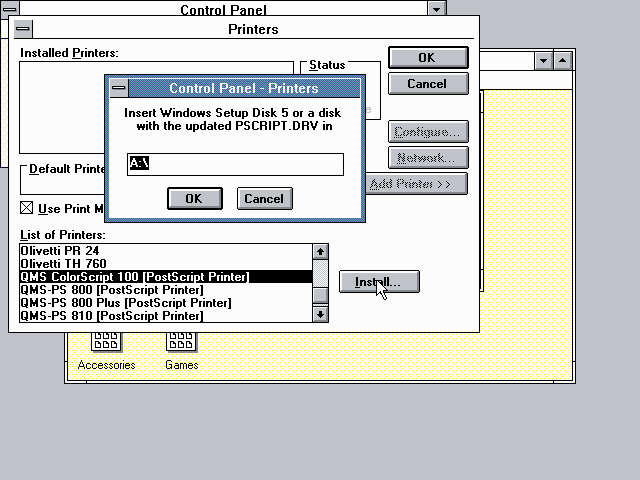
Make sure the newly installed printer is highlighted, and press the "Configure..." button. From the ports, select "FILE:" and press the "Setup..." button.
Now make sure the Printer is again set to "QMS ColorScript 100", and the Paper Size is set to something appropriate, and click on "OK".
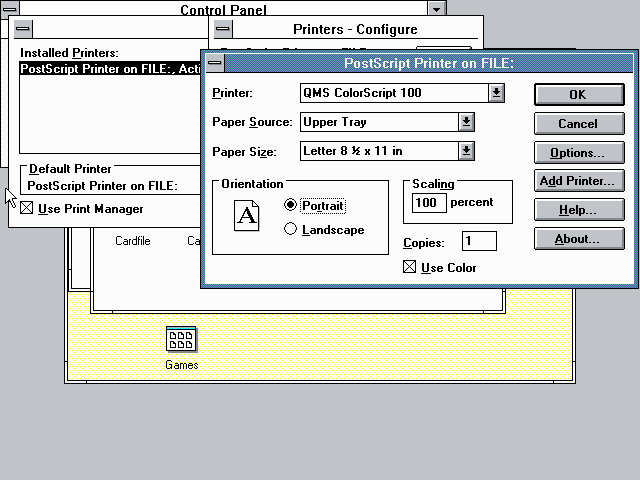
Close all the dialog's, by pressing "OK" until you're back at the "Control Panel".
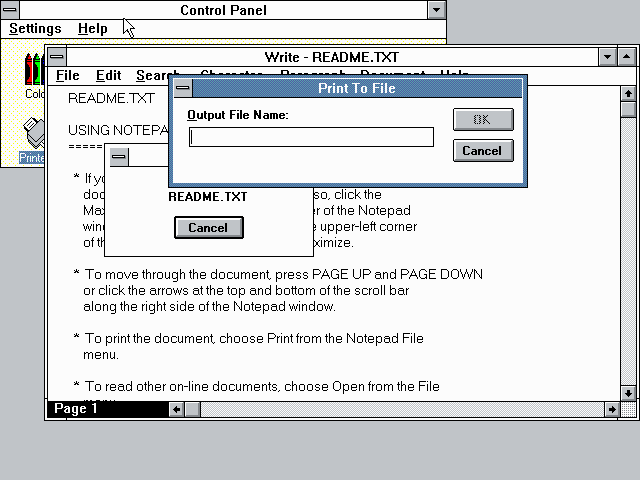
Now when you print in a Windows application, it will open a "Print To File" dialog where you can enter a path and filename (if a path is not specified, the file will be saved in either C:\WINDOWS, or for the multimedia edition in C:\MWINDOWS).
It is recommended to use the file extension .ps as it will be saved as a PostScript file.
You can now open the file on the host and either print it, or convert it to PDF. This is easiest on Linux, as it normally has the necessary tools installed. For Windows hosts it will be necessary to install something like GSview.
For macOS hosts, starting with macOS Ventura (13) PostScript support was removed from the Preview application. With this edition it is still possible to drag a PostScript file to the printer icon, but this support was also removed in macOS Sonoma (14). With recent macOS versions it is necessary to install ghostscript via brew to get the "ps2pdf" CLI utility to allow converting a PostScript file to PDF.
[Top]
Resources
- Wikipedia: Windows 3.0
- BetaWiki: Windows 3.0
- BetaWiki: Windows 3.00a Multimedia Edition
- Nerdy Pleasures: Windows 3.0 Multimedia Edition - Early Windows Multimedia Gaming
[Top]